
Not all easy MTB maintenance tips are obvious, until you know. So, in some kind of vague order:
Punctures
 Assuming you can remove & refit a tyre, make it easier by squeezing the beads into the middle (deepest part) of the rim with your finger & thumb all the way round. This makes the tyre much looser & it’ll often come off & go back on by hand. No tyre levers means much less chance of damaging the tube
Cassettes
The other day I put a new chain on because the old one was worn just past the limit. I had a very quick look at the cassette as well & it was hard to tell if it looked worn or not. I thought not & it isn’t that old so I left it where it was. Next ride, in the 2 smallest cogs the chain was jumping as if the teeth were worn out. On closer inspection though it was just a greasy gunk in the gaps between the cogs. The small cogs don’t have a deep space in between them so it fills up quicker. Quick scrape out with a screwdriver (or even a proper tool) & all is well. If it still happens when the cassette is clean then it’s time for a new one. Incidentally, I’ve found cheap cassettes outlast expensive ones, in 9 speed at any rate. Not sure why this should be, could be just bad conditions when using the good ones maybe
Chains
If your drivetrain is playing up & you suspect something’s worn, a proper chain gauge is well worth investing in. You’ll no longer need to guess at the cause… See a previous post for more info
Hubs
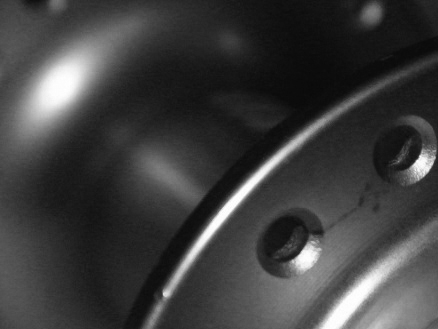 Apart from the usual things to check, a good reason to keep the bike clean is to check the hub flanges every so often for hairline cracks. It’s unlikely but if you spend a lot of time in the air or ride really aggressively or, ahem, you like your pies etc, then it’s more likely & spotting a hairline crack will give you a better chance to get the hub replaced before a big self destruct happens on a rocky downhill…
Use your eyes & also run your fingernail along the edge of the flanges. If there’s a crack, do not continue to use the wheel until it’s rebuilt with a new hub. Some brands will replace cheap under a crash damage scheme, some might even replace out of warranty for free if you’re nice…
Forks
A quick one which you may well already have heard – Fox forks with their very regular service intervals do better for storing the bike upside down. The lube oil will keep the foam rings under the seals nice & soaked. Providing it hasn’t run out. If the foam rings dry out they wear the anodising off the stanchion. Some Rockshox seem to leak oil out of the top cap if you store them upside down though.
Headsets
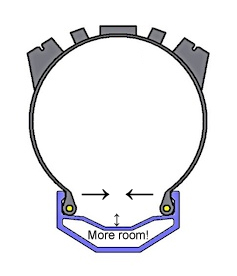
Assuming you know the mechanics of how to adjust a headset, the main thing to know about getting it right is that too loose can damage the headset & maybe the frame, but too tight or even just a bit sticky & YOUR STEERING WILL NOT WORK PROPERLY! If it doesn’t move freely you’ll lean into a corner & the bike will go straight on… Bad!
To make sure this doesn’t happen, when everything’s clean & re-greased & you’ve removed the play, lift the front wheel off the ground, holding the frame & give the handlebar a tap. The bar should rotate & keep going. If it comes to a sudden stop for any reason apart from the cables, the headset is too tight & dangerous! Re-adjust.
Seat-posts
1st off, if you have a steel frame & an alloy post, make sure you use grease, anti-seize or a fibre-grip type of compound. Check it regularly, especially if you never adjust the seat height mid ride, or it’s a dropper post. Clean it regularly & re-apply whatever grease or similar you’re using. If you don’t the 2 different metals can electrolytically corrode together & it’ll seem like it’s been welded in! There are various extreme ways of sorting it but they’re not guaranteed to work & can damage your frame…
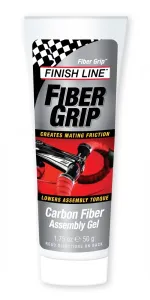 If you are using a standard alloy post in an alloy frame, grease is fine. Carbon posts & certain dropper posts benefit from fibre-grip or ‘liquid torque’ to reduce the torque needed on the seat clamp to secure the post. For carbon posts this is obviously a good idea. Excessive torque on the clamp can interfere with the operation of some dropper posts.
Whilst talking about dropper posts, I have a KS myself & I’ll just mention a quick tip for KS posts; If you follow advice I’ve seen on the net to unscrew the top collar & oil the shaft then replace the collar, too much oil will cause the shaft to pop back up a bit when you lower it. The oil seems to take up too much space somewhere & cause a bit of pressure. So a very small amount of the recommended kind of grease is much better. If this has already happened, KS provide instructions to partially strip & reassemble some of their models.
Disc brakes
If you’ve removed a set of pads & the pistons won’t push back in, they might be seized. This can be just baked on dirt as they get really hot. Washing powder is great at removing it. An old toothbrush dipped in water then in some washing powder is ideal for cleaning the pistons. Avoid using metal tools directly to push the pistons in unless it’s a specific tool. Best way is to refit some old pads & use a screwdriver in between the old pads. Another reason to avoid pushing directly on the pistons is that the ones with a locator pin for the pads can be damaged easily. You can snap the pin off if you’re not careful.
About Chasing Trails
Recent Posts
-
Steve Peat – Forged by Speed

As I’ve mentioned before,…
-
The Cycling Bible from Vertebrate Publishing & Chris Sidwells

I’ve reviewed a few…
Copyright © 2019. All rights reserved